Resiliently Serving a Jupyter Notebook on a Virtual Machine
Contents
1. Objective #
This tutorial shows how to set up a Jupyter Notebook server on a virtual machine. Particularly, this tutorial walks through the procedure of launching a Jupyter Notebook server on an AWS EC2 instance. Granting that the user will need to run long tasks on the instance, this tutorial presents an interruption-resilient procedure to launch the server without the risk of losing the active kernel nor running subprocesses if the user’s computer (i.e. the local computer) loses connection to the instance for whatever reason.
2. Scope #
This tutorial will covers the following topics:
- Starting a virtual machine remotely and connecting to it using
SSH; - Getting the instance ready — updating the image and packages;
- Installing Jupyter, starting a Jupyter Notebook server and creating a tunnel to it using
SSH; - Connecting to the Jupyter Notebook server from your local computer and keeping the connection alive;
- Disconnecting from the server and closing the virtual machine.
3. Introduction #
Jupyter Notebook is the de facto tool to sandboxing in Python and presenting your work as fluidly as possible. Personally, Jupyter Notebook is my tool of preference to either do a machine learning model or write a document like this. It’s its flexibility what makes it so popular — so popular that most cloud platforms like Amazon or Google offer “Jupyter instances” (virtual machines that run Jupyter out-of-the-box).
Furthermore, when it comes to using the system’s resources (e.g. CPU, GPUs, memory, etc.), Jupyter is just a medium — it uses an IPython kernel to run Python back-end and, with that, manage these resources in a more direct and efficient way. For this reason, many people take the most advantage of Jupyter using powerful virtual machines that they can rent from Amazon Web Services (AWS) or Google Cloud Platform (GCP). However, although running a Jupyter instance from AWS’s Sagemaker or GCP’s Cloud Datalab or Cloud ML-Engine is practical, you are still constrained to many things related to the nature of the service provided — e.g. what is offered in terms of available packages and frameworks, how do you connect to your data, and so on.
For this reason, running Jupyter on a vanilla virtual machine is the best way to have all the freedom you want to set up the instance just like you want. Moreover, companies like AWS offer the possibility of using their virtual machines with preinstalled images (Amazon Machine Image, AMI) and packages optimized for certain types of jobs, like deep learning ( DLAMI). This is, in my opinion, particularly efficient since deep learning frameworks like TensorFlow or PyTorch do not have native ways to optimize the use of the specific hardware installed in a machine — as Kovalevskyi points it out extremely well in this article, it is the hardware manufacturer that provides optimized low-level drivers or APIs, which also need to be leveraged with some extra ad hoc tuning, so that you can get the most out of the hardware while using these frameworks and vice versa.
In this tutorial, two AWS EC2 (virtual machine) instances will be used to install and run a Jupyter Notebook server — an Amazon Linux 2 AMI and a Deep Learning (Ubuntu) AMI.
4. Requirements #
This is a beginner-level guide. The requirements below are suggested to adequately along:
- Have a *nix CLI installed on your computer (e.g.
bash) and be acquainted with it; - Have an AWS account already created. This will not be explained since creating an AWS account is pretty rudimentary — just like creating any other type of online account;
- Have some knowledge about the Secure Shell Protocol,
SSH; and, - Have some knowledge about Jupyter Notebook and Anaconda.
I am doing this on MacOS X, using bash version 3.2.57. The AWS EC2 on-demand instances to be used will be: an Amazon Linux 2 AMI (HVM), 64-bit (x86), t3.large (2 vCPU, 8 GB RAM), and a Deep Learning AMI (Ubuntu), 64-bit (x86), p3.2xlarge (8 vCPU, 1 GPU w/16 GB GPU Memory, 61 GB RAM). (Note: HVM stands for Hardware Virtual Machine, which is the better option since it gives you better access to the underlying hardware of the machine; more details here).
Important note In this tutorial AWS EC2 instances will be launched. The use of these instances will have a cost that will be charged to the payment method set up to your AWS account. If you decide to proceed with it, do not forget to stop or terminate the instances when done, otherwise they will keep charging you for as long as they are running.
5. Lauching the Instance #
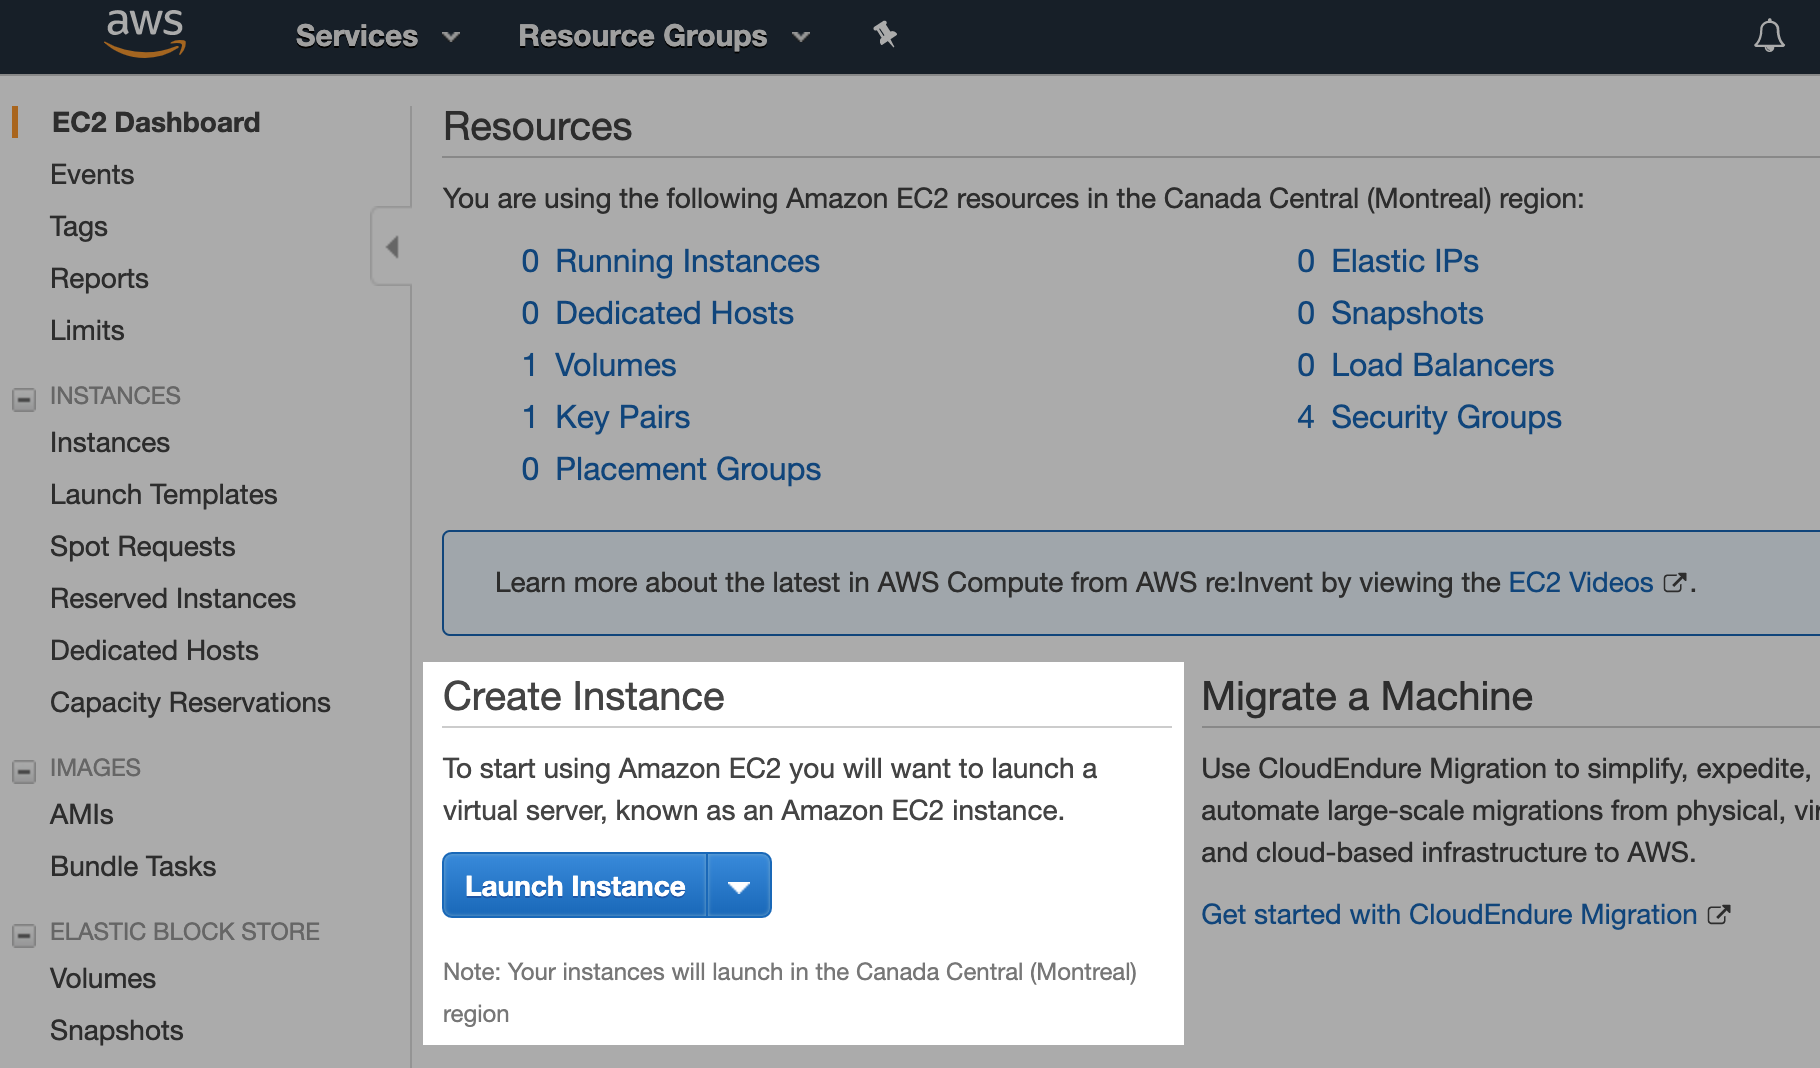
After logging into the AWS Console with your AWS account, click on the Services button on the top left, and in the Compute section, choose EC2. This will take you to the EC2 Dashboard page.
Once here, you have to launch a new instance — a virtual machine. To proceed, click on Launch instance in the Create Instance section:
This will take you to the Launch Instance Wizard site, which allow you to set up and launch the instance you desire. An instance creation has seven steps, namely:
- Choose AMI
- Choose Instance Type
- Configure Instance
- Add Storage
- Add Tags
- Configure Security Group
- Review
While some steps require no modifications to the default settings, all seven steps will be briefly visited in the following subsections.
5.1 Choosing the AMI #
The first step is to choose the AMI — the image you want preinstalled on your instance. By default, you will be selecting from the Quick Start list (left bar). For the Linux instance, choose the Amazon Linux 2 AMI (HVM), SSD Volume Type, 64-bit (x86). To choose the Ubuntu for Deep Learning AMI, you have to go to the Community AMIs tab on the left bar and filter by Ubuntu. Here, choose the Deep Learning Base AMI (Ubuntu) Version X.Y, 64-bit (x86). The X.Y represent the Ubuntu version that will be preinstalled. These versions evolve quite often, so I will not point to a specific version here. However, select one that explicitly offers the framework(s) you want to work with — e.g. TensorFlow, PyTorch, Keras, etc.
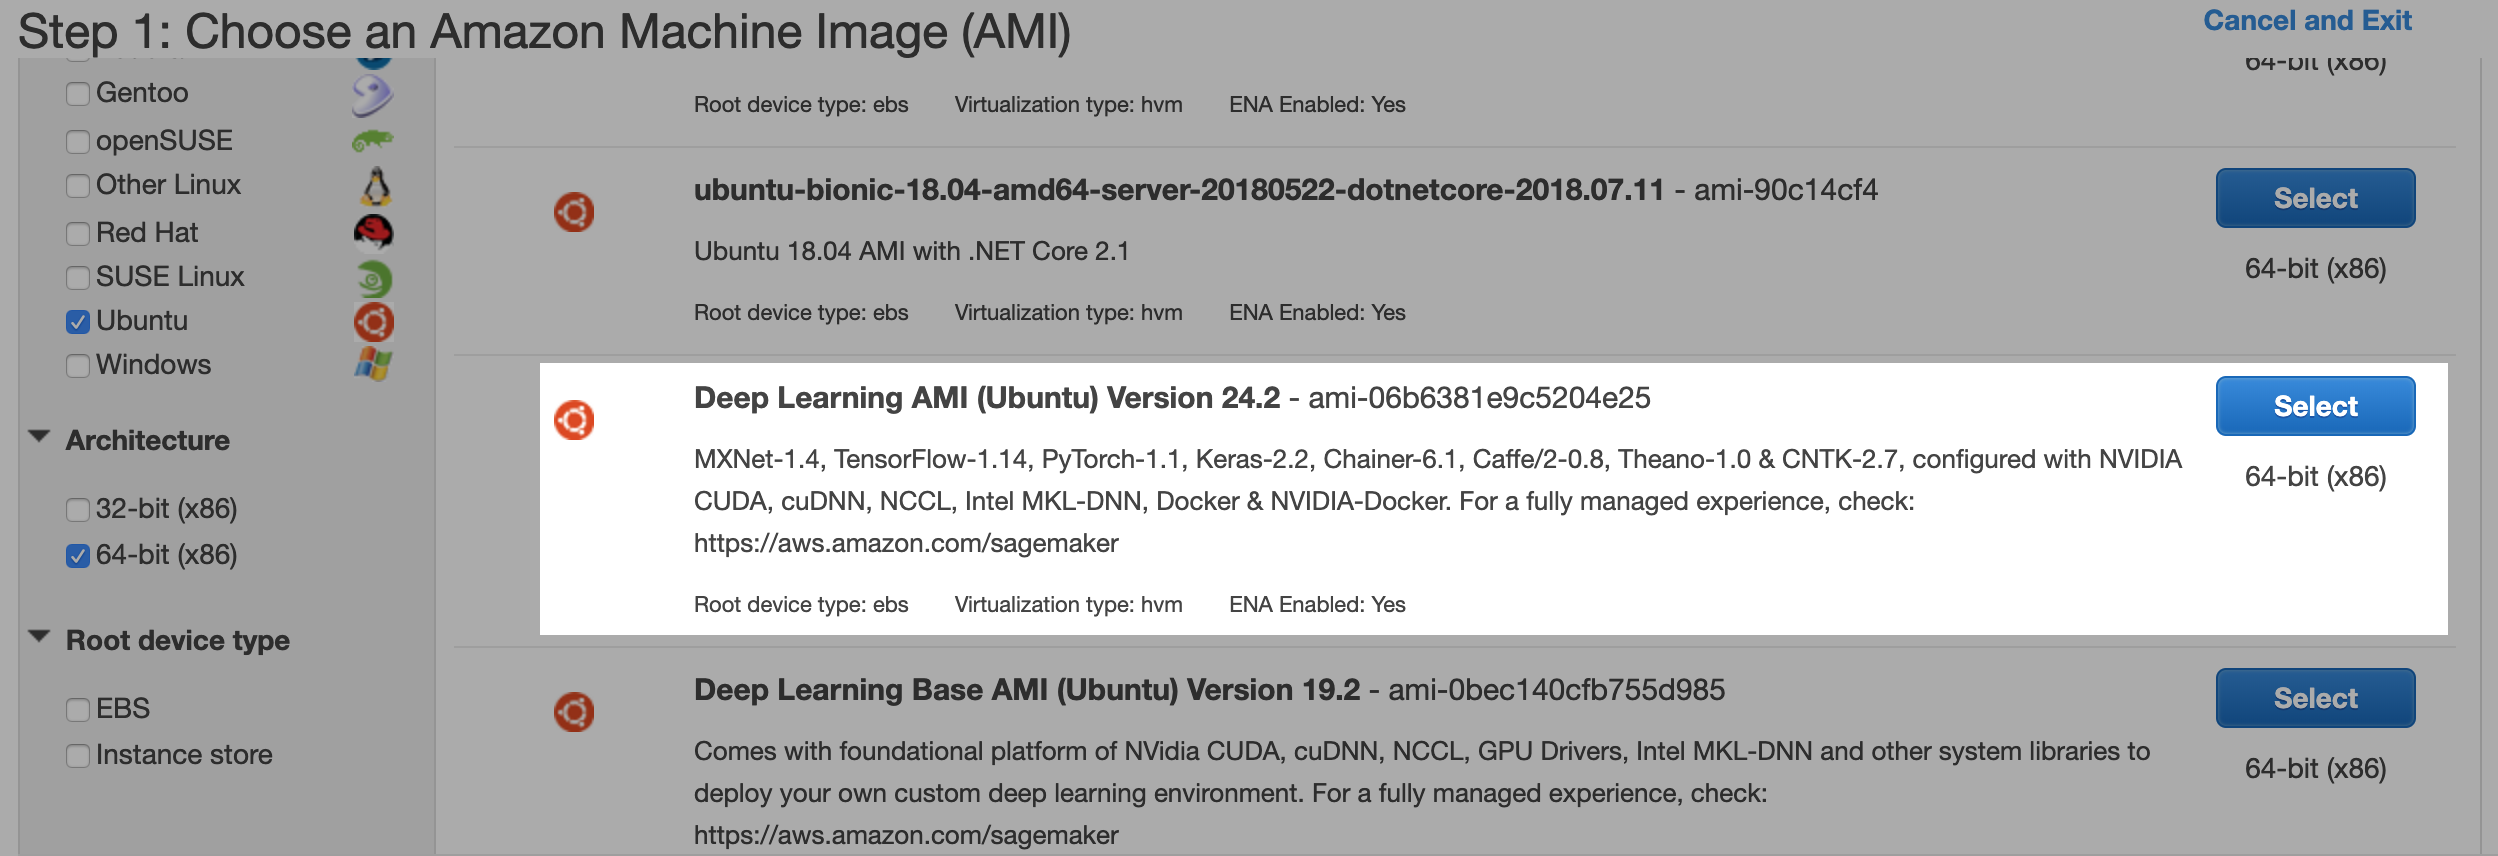
You can find the Deep Learning AMIs’ developer guide here.
5.2 Choosing the instance type #
Select the instance with the hardware of your preference. Note that EC2 offers instances grouped by the features they are optimized for. For the Linux 2 AMI, an instance from the General purpose family will suffice since it can be used for a wide range of purposes, e.g. regular Machine Learning (ML) algorithms. In this group we can choose instances with more than one vCPU and several memory configurations. Also, in this group we will find the instances that belong to the “Free tier”, which are free for a period of time.
For the Deep Learning AMI, we will choose an instance from the GPU instances group. Particularly, AWS has developed the p2/p3 families, the latter being the newest one, which are optimized for using GPUs for Deep Learning (DL) purposes. Detailed information about the p3 family can be found here, and a detailed list with all instance families here. The p3 family offers instances with one or more GPUs and different number of vCPU and memory size configurations.
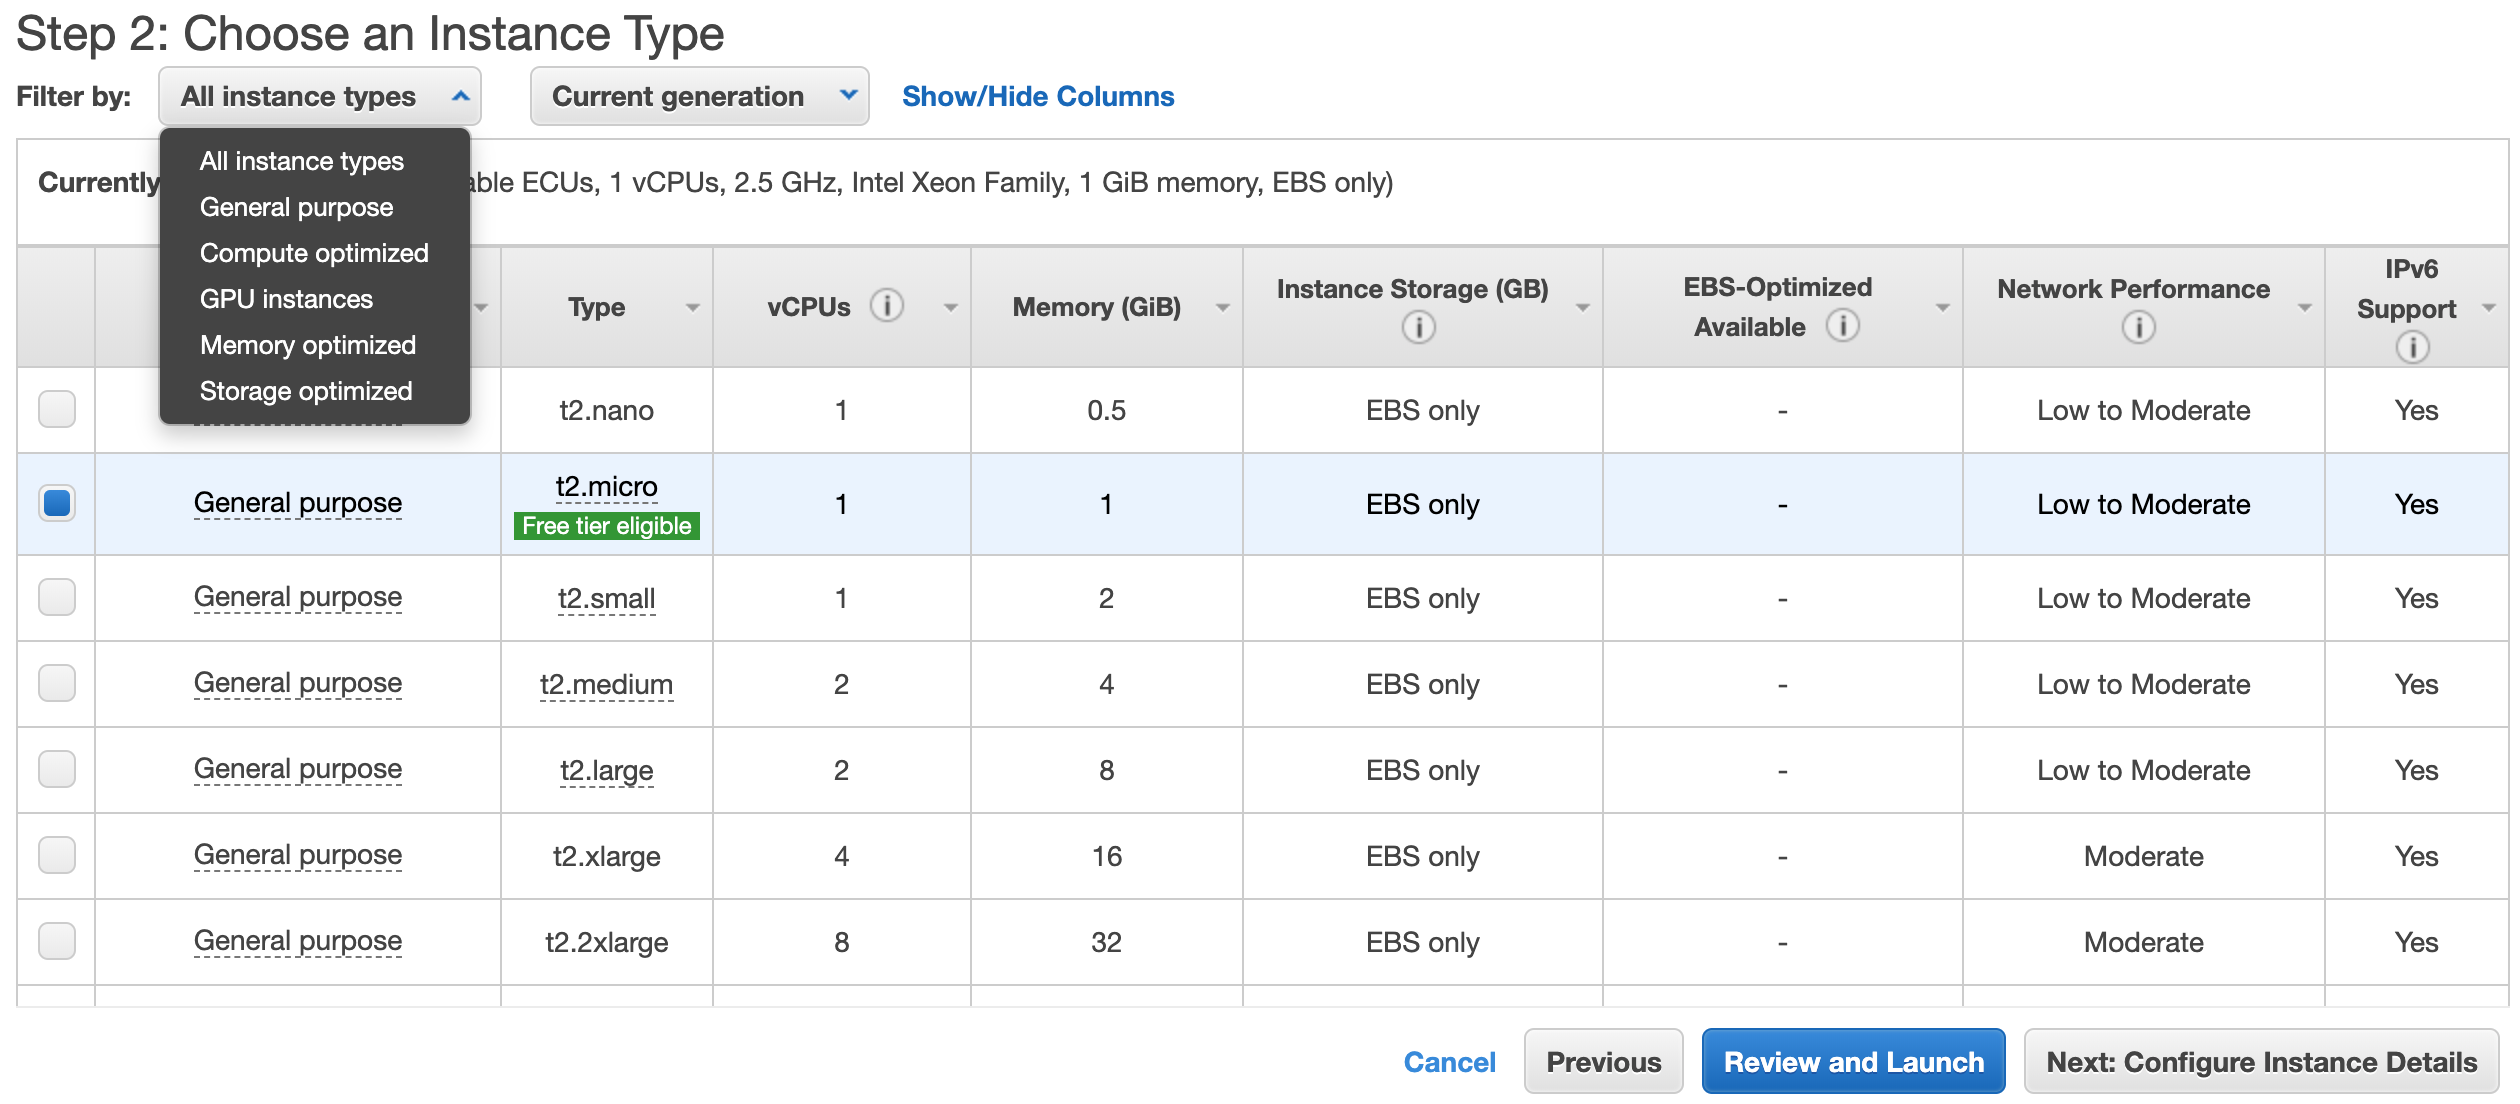
The pricing for all instance families can be found here. Note that the pricing will vary according to the Region from which you launch the instance. Also, note the Instance Storage value of the instance you are about launch — this will be explained further in the following subsections.
To continue, click on Next: Configure Instance Details.
5.3 Configuring the instance #
While nothing will be modified here, I want to point out a couple things. First, is the Network and Subnet options. By default, the instance(s) you launch will be placed in a VPC — Virtual Private Cloud — of the region you chose and in a particular subnet. When an instance is created, it is assigned a public IP address such that it can be controlled remotely. This IP address belongs to a subnet, which is at the same time located inside a VPC. While you will not be modifying these values, this is important to know since it will allow you to add inbound and outbound permissions for your instance.
The next thing is the Shutdown behavior. This allows AWS know what to do when you decide to shutdown the instance. This will be explained with more detail later on. However, the default option, Stop, allows you to shutdown the instance and to stop being charged for the usage of the virtual machine.
To continue, click on Next: Add Storage.
5.4 Adding storage #
This step allows you to set the storage types and sizes you want for your instance. You can get a useful summary about different storage types for AWS EC2 instances and their main characteristics here. For instance, I have set 8 GB of EBS backed-instance store and 15 GB of additional EBS store for the instance I am launching:
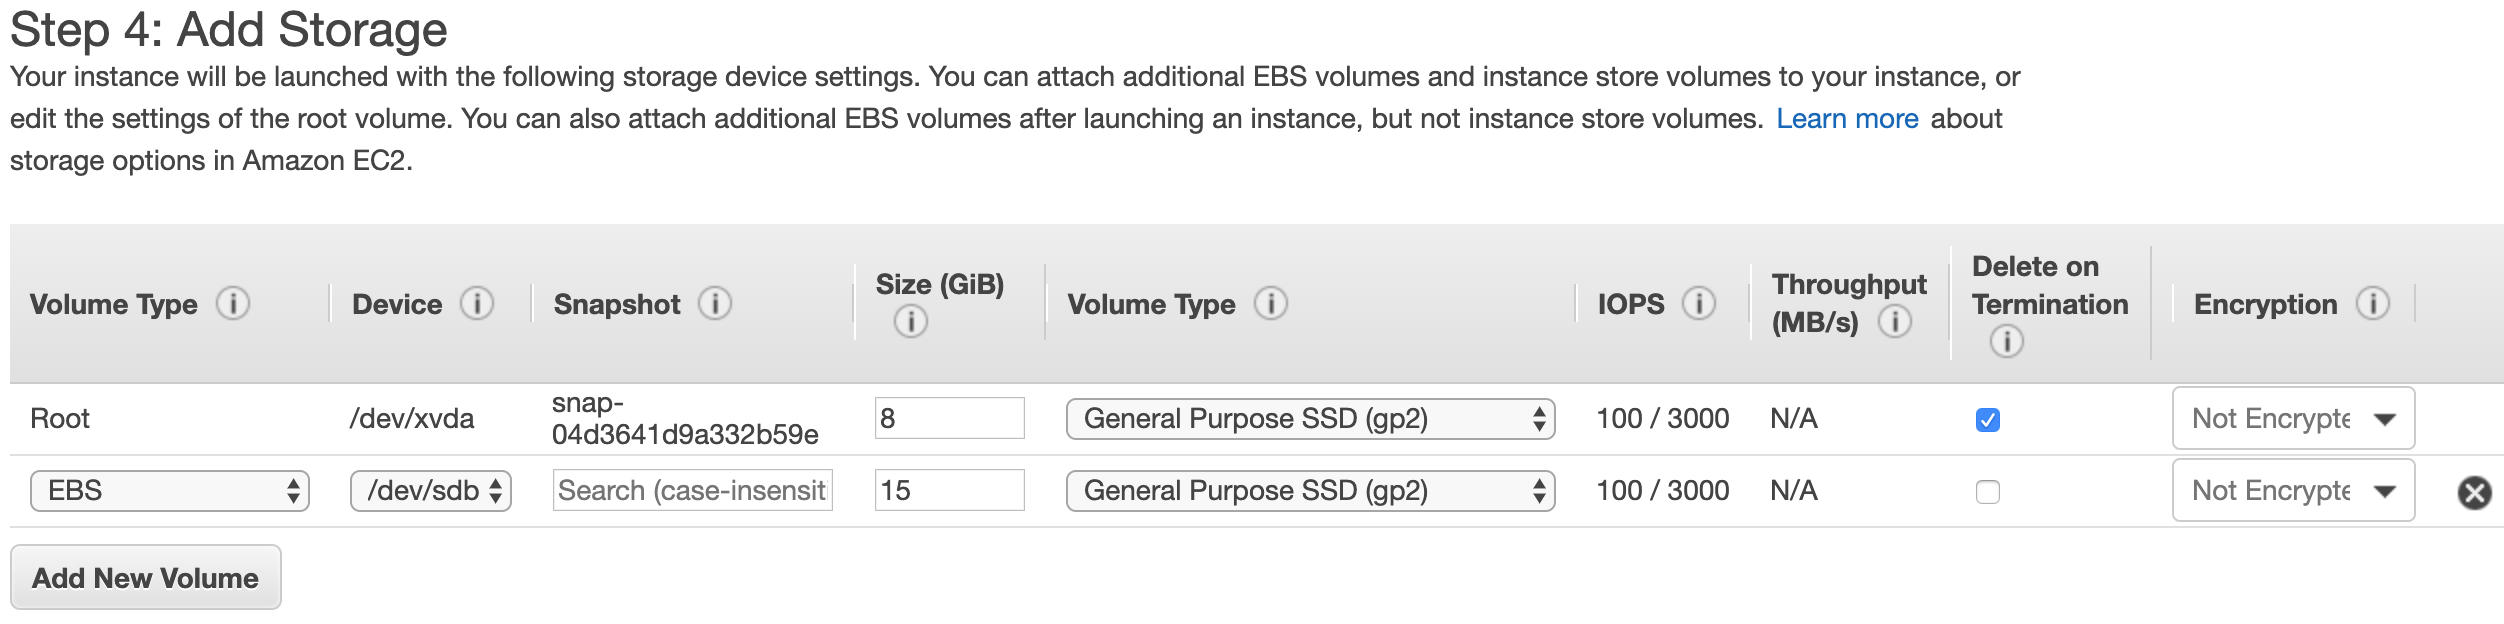
The main advantage of EBS (Elastic Block Storage) is its portability — it allows you to attach and detach EBS volumes from any instance very easily. In practical terms, the instance store (root) is ideally only used to store the image, packages and general software you will be working with (e.g. Jupyter Notebook), while the additional EBS volumes — in this example the 15 GB one — are used to store your work, such that you can later move it around accross different instances.
The instance store can also be of a physical type, called instance store-backed instance — storage that is actually attached to the virtual machine’s hardware. However, this type of storage will only exist during the lifetime of the instance. In contrast, EBS store can be conserved after the instance is terminated, whether by creating a snapshot of its content (which will be automatically stored in S3) or by detaching it and attaching it on another instance.
You can find information about EBS store pricing here.
Note: The root storage for the Deep Learning AMI will ask you for at least 75 GB when creating the instance. However, this is on the short end, since the image alone will mostly fill up all this volume. In this sense, I would recommend assigning some 85 GB.
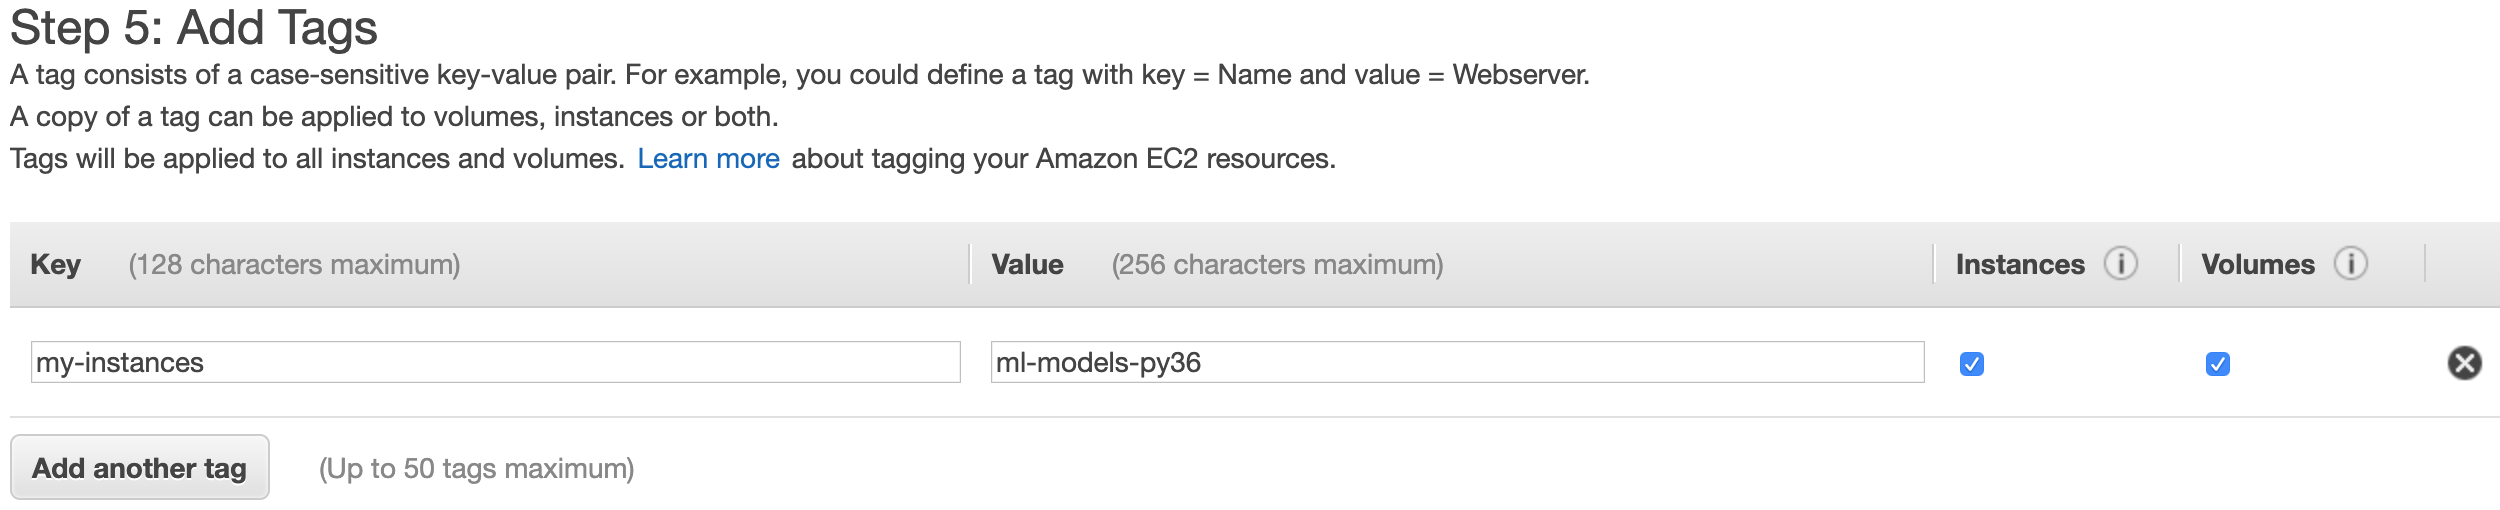
5.5 Adding tags #
Tags allow you to add key-value pairs of tags to organize your instances and other EC2 elements, like EBS Volumes. For instance, for this instance, which I will be using for ML models with Python 3.6, I will add a tag with the key my-instances and the value ml-models-py36:
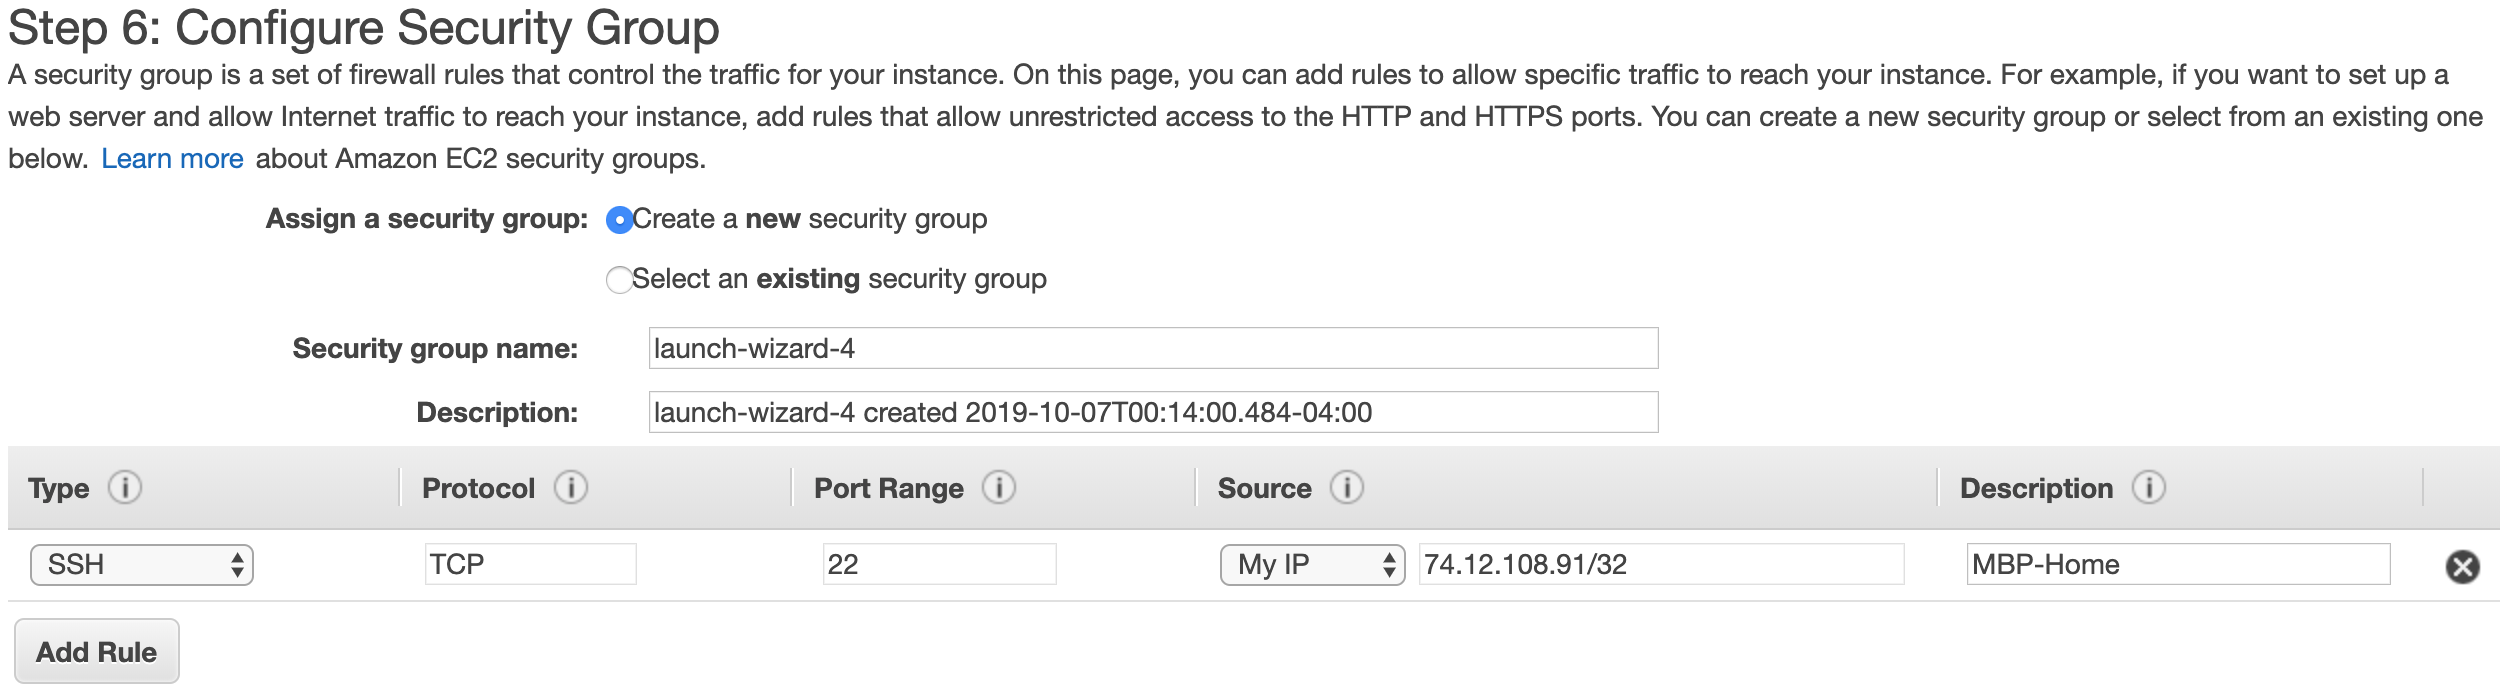
5.6 Configuring the Security Group #
As previously mentioned, the instance you’re setting up will be assigned to a VPC and to a subnet inside that VPC. A Security Group, which by default assigned to the instance’s VPC, is a group of inbound and outbound traffic rules that will affect all the AWS objects that are assigned to that Security Group. For instance, you can have two instances running, and one of them is assigned to a Security Group that only lets inbound communication from your IP, and the other one assigned to a VPC that lets in communication from your entire office. Furthermore, these rules are applied on a TPC/IP port-level, thus only allowing or blocking certain types of connections to the objects in that group (e.g. SSH, SQL-type, etc.).
In this step, it is necessary to create a Security Group and add an inbound rule such that the instance that you are launching, which will be assigned to that group, will allow inbound connections to it — an inbound connection from your computer. To do this, choose Create a new security group, and add a rule with the options as specified below: SSH for connection type (this will automatically fill up the Protocol and Port number), and My IP (which will automatically fill up your current public IP address). Finally, erase the default rule such that only the one created by you remains.
You can always assign a custom group name, group description, and rule description. The rule description is quite useful if you work from different places, since your public IP address will change as you change connections — e.g. routers.
5.7 Reviewing the instance configuration #
After reviewing all the settings, click on Launch. This will pop up a new window that will ask you to choose (or generate) and download a Key Pair. This will be explained in the following subsection.
5.8 Generating a key pair #
A key pair is regional, and it consists of a public key — which is assigned to the instance at the moment of creation — and a private key, which is the file you will download (a .pem file). These keys are mandatory to connect to the instance you are launching. Their usage will be further explained later on. As stated in the popup window, you will have to name the key pair (or choose an existing one), and store the private key — that you are about to download — in a safe place. If you lose the key, you cannot get a second one and you will lose access to the instance. If you are creating an EBS store-backed Linux (or Ubuntu) instance, you can recover whatever information you have in the instance following
this procedure. If it is an instance store-backed instance, then the information stored in the instance storage will be lost. Note that, for the General purpose or the GPU instances families, the default storage is EBS.
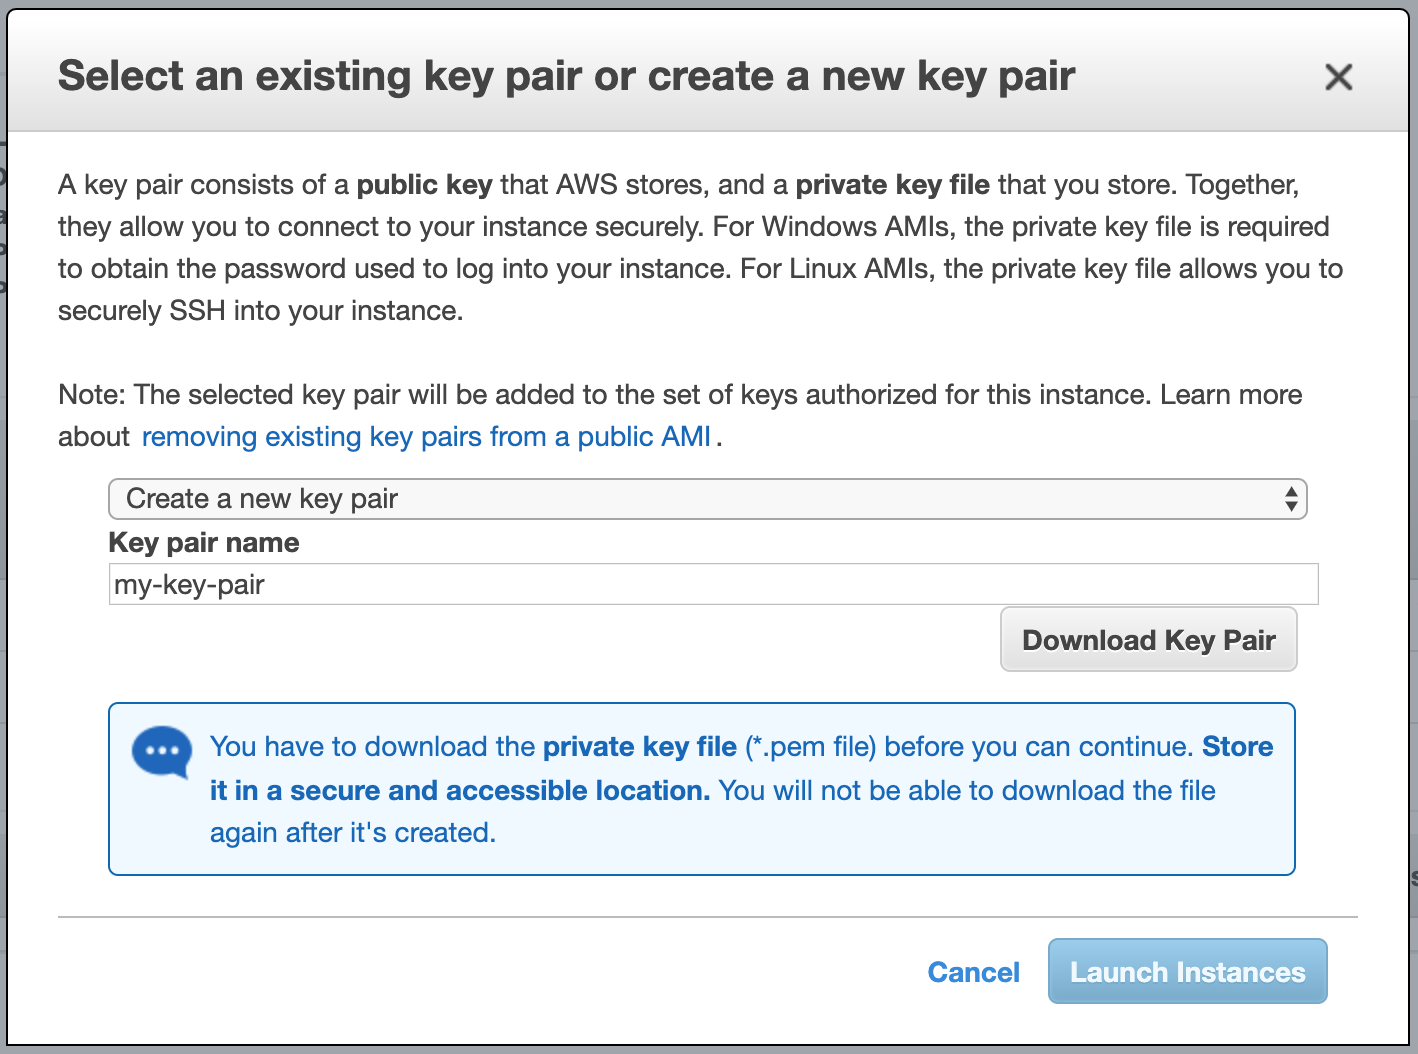
If you have never created a key pair before, choose to create a new key, provide a name for it (in my case my-key-pair) and click on Download Key Pair, and the on Launch Instances. After the instance starts, return to the EC2 Console/Instances and select the launched instance.
You can find detailed information about AWS EC2 Key Pairs here.
6. Connecting to the Instance #
Once the instance is running, the next step is to connect to it using the Secure Shell Protocol, SSH, which is a cryptographic network protocol for operating network services securely over an unsecured network. You can find further general information about SSH
here.
6.1 Changing the permissions of the private .pem key #
To use the key you downloaded to connect to the instance, first, it is necessary to change the permissions of the file, such that the user can only read it (make it non-overwritable) and nobody else (group and others) has access to it. To do this, the chmod command, which is used to modify file permissions, will be used to modify the access modes of the file. This command is built-in in the CLI of *nix environments, like bash. Further general information about chmod can be found
here, and a simple tutorial with practical use cases,
here.
In a new shell window, go to the directory where you stored the key, and enter and run:
$ chmod 400 my-key-pair.pem
If the key is not in the current directory, the whole path of the key can also be passed in (and using single- or double-quotes if the path has spaces inbetween).
As stated before, this will make the private key file non-overwritable by the user.
6.2 Retrieving the user and the public DNS and IP #
With the instance selected, click on the Connect button at the top. This will open a window showing the user@host information:
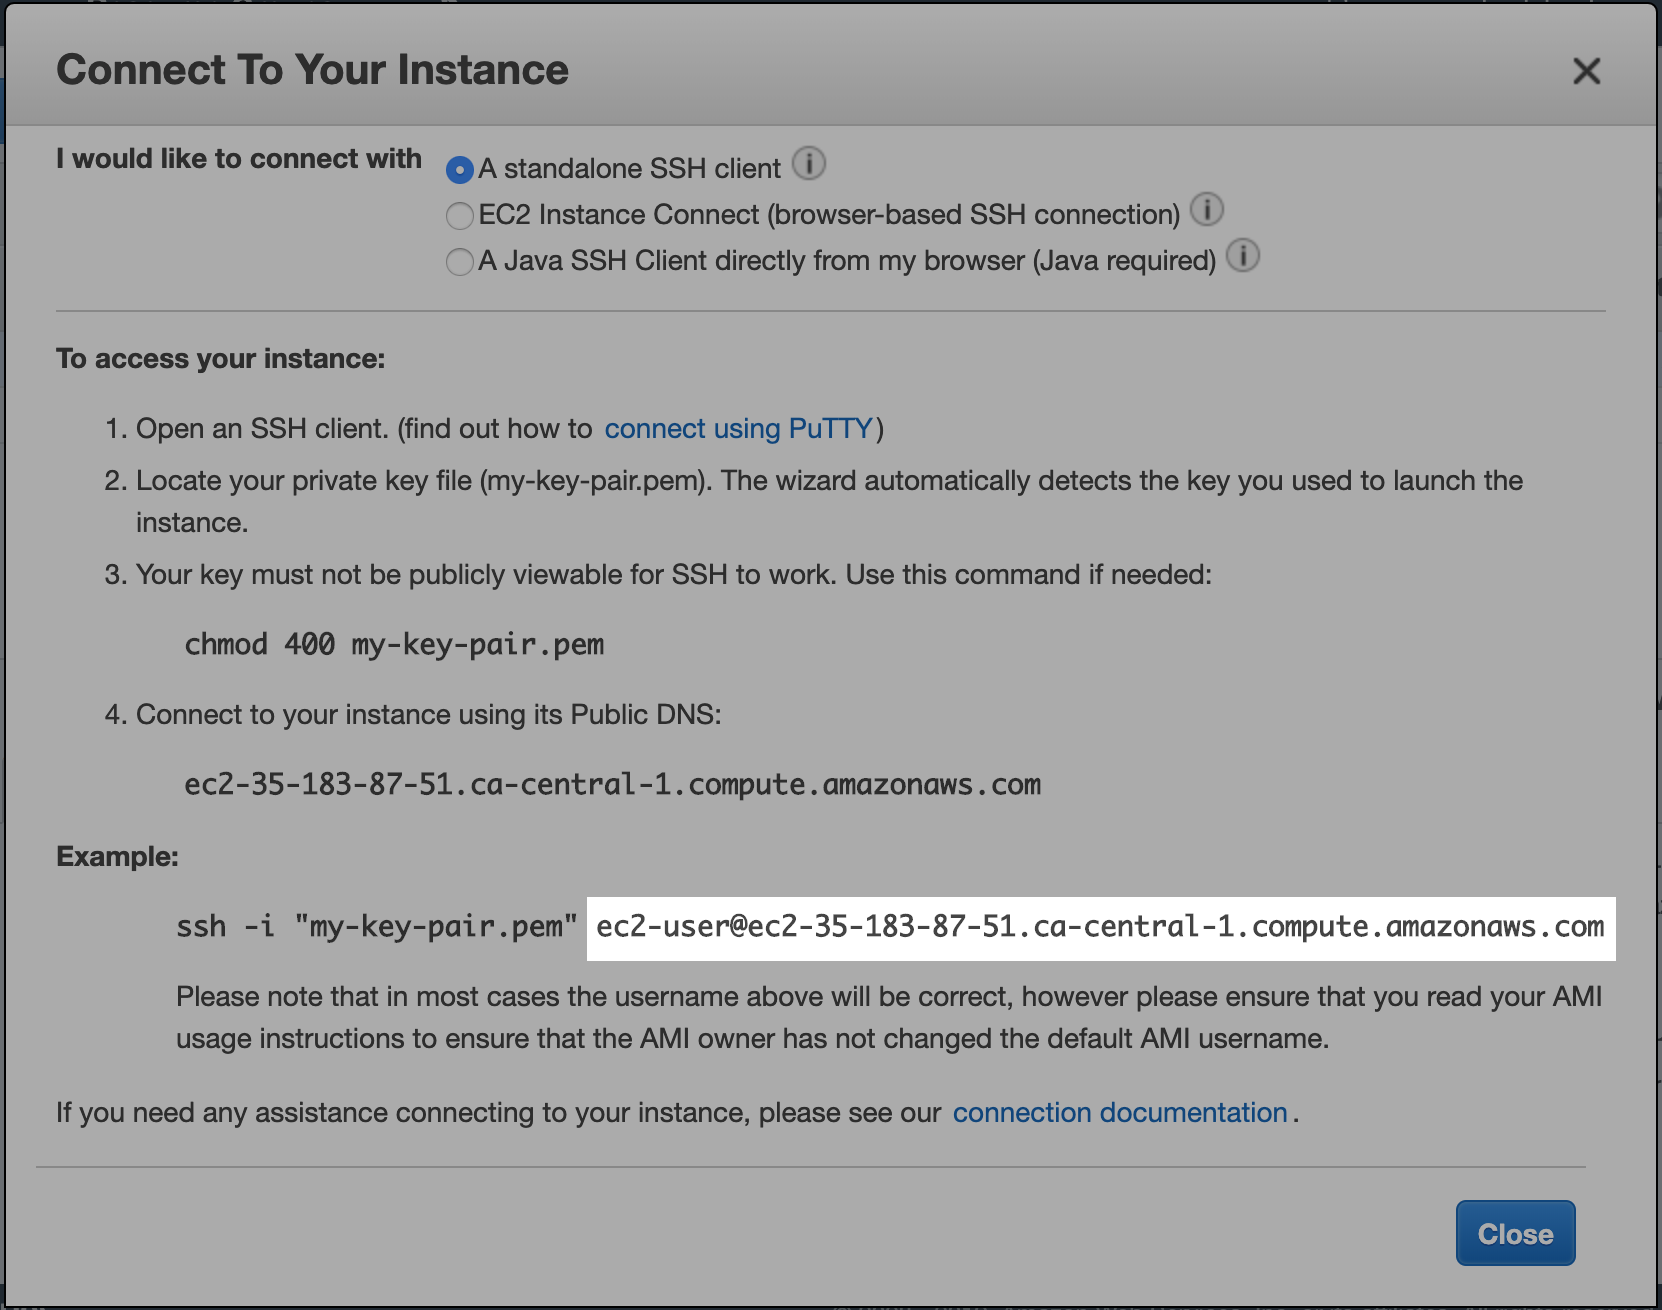
The default user for this instance is ec2-user and the host ec2-35-183-87-51.ca-central-1.compute.amazonaws.com. In Ubuntu instances, the default user is generally ubuntu.
Close the window and now notice the instance description at the bottom of the page. Take note of the Public DNS (IPv4) and IPv4 Public IP values. Note that the Public IP is contained (but with dashes) in the DNS address. This is because they can be used interchangeably — both DNS address and Public IP can be used as the host name.
6.3 Connecting to the instance using SSH #
After making the private key file non overwritable, the following step is to connect to the instance using SSH. To do this, enter and run:
$ ssh -i private_key user@host
For example:
$ ssh -i my-key-pair.pem ec2-user@ec2-35-183-87-51.ca-central-1.compute.amazonaws.com
Or, using the Public IP:
$ ssh -i my-key-pair.pem ec2-user@35.183.87.51
The -i flag passed in to SSH states that a key will be used to connect to the host. After the key, the user@host information is passed in next to it.
After running the previous command, the following message will show up everytime the local public IP address (your IP) is new to the EC2 instance:
The authenticity of host '35.183.87.51 (35.183.87.51)' can't be established.
ECDSA key fingerprint is SHA256:<alphanumeric>.
Are you sure you want to continue connecting (yes/no)?
Enter yes and this is it. You are now connected to your EC2 instance! An EC2 logo will show up in the screen. Also, the prompt will change to that of the Virtual Machine you are connected to:
[ec2-user@ip-172-31-30-31 ~]$
This prompt indicates you are the ec2-user user at ip-172-31-30-31, which is a private IP in the Network Interface your instance is assigned to, and that you are in the home ~ directory.
Troubleshooting
If there is no response after running the ssh command, it could be due to not having an inbound rule for your local public IP. To check the inbound rules of the instance’s Security Group, go in the console to AWS/EC2/Instances, and select the instance.
Then, in the instance description (bottom panel), go to Security groups and click on the link to the security that the instance is assigned to. Here, either in Actions or by right-clicking on the security group, go to Edit inbound rules. A new window will pop up and repeat the instructions given in subsection 5.6. Save and try running the ssh command again.
7. Updating the Instance #
Note: This section, and the following one, will be presented separately for both AMIs — for the Amazon Linux 2 AMI and for the Deep Learning (Ubuntu) AMI — since there are differences in the procedures to follow.
Even when an instance is created from a AMI — an Amazon image —, not all the versions of the many components of the AMI will be the latest ones. For this reason, it is necessary to update the AMI. Particularly for the Deep Learning AMIs, it is critical to update them to actually be able to take the maximum advantage out of the instance.
While some instances’ OS will often immediately recognize the available updates, sometimes this will not happen and you will have to reboot the instance. To do this, from the terminal window where you are running SSH, run:
$ exit
Then, reboot the instance (by selecting it from the EC2 Console/Instances and clicking on Actions/Instance State/Reboot). Next, reconnect to it using SSH as shown in subsection 6.3.
7.1 Amazon Linux 2 AMI #
Amazon Linux 2 is a Linux-based server operating system that Amazon developed and that it uses for its EC2 instances. You can find further information about this OS here.
After rebooting and reconnecting to the instance using SSH, you will be welcomed by a screen like the following one:
       __|  __|_  )
       _|  (     /   Amazon Linux 2 AMI
      ___|\___|___|

https://aws.amazon.com/amazon-linux-2/
16 package(s) needed for security, out of 32 available
Run "sudo yum update" to apply all updates.
As stated in the welcome screen, proceed to update the system running:
$ sudo yum update
Note that yum is the default OS package manager for Amazon Linux 2. You can find a useful cheatsheet
here.
7.2 Deep Learning (Ubuntu) AMI #
Amazon’s Deep Learning AMIs are offered for a number of operating systems. You can find more information about the offered Machine Learning AMIs here.
After rebooting and reconnecting to the Ubuntu instance using SSH, you will be welcomed by a screen like the following one:
=============================================================================
       __|  __|_  )
       _|  (     /   Deep Learning AMI (Ubuntu) Version 24.2
      ___|\___|___|
=============================================================================

Welcome to Ubuntu 16.04.6 LTS (GNU/Linux 4.4.0-1094-aws x86_64v)

Please use one of the following commands to start the required environment with the framework of your choice:
for MXNet(+Keras2) with Python3 (CUDA 10.0 and Intel MKL-DNN) _____________________________________ source activate mxnet_p36
for MXNet(+Keras2) with Python2 (CUDA 10.0 and Intel MKL-DNN) _____________________________________ source activate mxnet_p27
for MXNet(+Amazon Elastic Inference) with Python3 _______________________________________ source activate amazonei_mxnet_p36
for MXNet(+Amazon Elastic Inference) with Python2 _______________________________________ source activate amazonei_mxnet_p27
for TensorFlow(+Keras2) with Python3 (CUDA 10.0 and Intel MKL-DNN) ___________________________ source activate tensorflow_p36
for TensorFlow(+Keras2) with Python2 (CUDA 10.0 and Intel MKL-DNN) ___________________________ source activate tensorflow_p27
for Tensorflow(+Amazon Elastic Inference) with Python2 _____________________________ source activate amazonei_tensorflow_p27
for Tensorflow(+Amazon Elastic Inference) with Python3 _____________________________ source activate amazonei_tensorflow_p36
for Theano(+Keras2) with Python3 (CUDA 9.0) _____________________________________________________ source activate theano_p36
for Theano(+Keras2) with Python2 (CUDA 9.0) _____________________________________________________ source activate theano_p27
for PyTorch with Python3 (CUDA 10.0 and Intel MKL) _____________________________________________ source activate pytorch_p36
for PyTorch with Python2 (CUDA 10.0 and Intel MKL) _____________________________________________ source activate pytorch_p27
for CNTK(+Keras2) with Python3 (CUDA 9.0 and Intel MKL-DNN) _______________________________________ source activate cntk_p36
for CNTK(+Keras2) with Python2 (CUDA 9.0 and Intel MKL-DNN) _______________________________________ source activate cntk_p27
for Caffe2 with Python2 (CUDA 9.0) ______________________________________________________________ source activate caffe2_p27
for Caffe with Python2 (CUDA 8.0) ________________________________________________________________ source activate caffe_p27
for Caffe with Python3 (CUDA 8.0) ________________________________________________________________ source activate caffe_p35
for Chainer with Python2 (CUDA 10.0 and Intel iDeep) ____________________________________________ source activate chainer_p27
for Chainer with Python3 (CUDA 10.0 and Intel iDeep) ____________________________________________ source activate chainer_p36
for base Python2 (CUDA 9.0) ________________________________________________________________________ source activate python2
for base Python3 (CUDA 9.0) ________________________________________________________________________ source activate python3

Official Conda User Guide: https://docs.conda.io/projects/conda/en/latest/user-guide/
AWS Deep Learning AMI Homepage: https://aws.amazon.com/machine-learning/amis/
Developer Guide and Release Notes: https://docs.aws.amazon.com/dlami/latest/devguide/what-is-dlami.html
Support: https://forums.aws.amazon.com/forum.jspa?forumID=263
For a fully managed experience, check out Amazon SageMaker at https://aws.amazon.com/sagemaker
=============================================================================

 * Documentation:  https://help.ubuntu.com
 * Management:     https://landscape.canonical.com
 * Support:        https://ubuntu.com/advantage

  Get cloud support with Ubuntu Advantage Cloud Guest:
    http://www.ubuntu.com/business/services/cloud

43 packages can be updated.
21 updates are security updates.

New release '18.04.2 LTS' available.
Run 'do-release-upgrade' to upgrade to it.
To initiate the updating process, it is first necessary to fetch the OS updates using the Linux-based way, with sudo apt. Run:
$ sudo apt update
Then, to proceed to install the updates. Run:
$ sudo apt upgrade
Follow the instructions on the screen and, when the process is done, clean any residual files with:
$ sudo apt autoremove
After the autoremove process is completed, reboot the system again, as explained at the beginning of this section. Again, it is extremely important to do this, otherwise the instance will not be able to take advantage of the full power of its hardware.
Finally, you can upgrade the OS version if you want to, as stated in the welcome screen: New release '18.04.2 LTS' available.. However, this is not necessary since the AMI is already optimized to run on, in this case, Ubuntu 16.04.6 LTS. If you decide to proceed with this upgrade, run:
$ do-release-upgrade
And follow the instructions on the screen to complete the process. This process might take several minutes (~20 min).
8. Setting Up Anaconda and Jupyter #
This section will present the procedure to set up Anaconda, whose main distribution includes the package manager, conda, and Jupyter, for the Amazon Linux 2 AMI. In the case of the Deep Learning (Ubuntu) AMI, conda and several other packages come pre-installed with the AMI. Therefore, it is only necessary to activate it for the framework you want to work with.
8.1 Amazon Linux 2 AMI #
To install an Anaconda distribution, the first step is to download the installation package from either the
the Anaconda archive or
the Continuum archive. For this instance (a Linux-based x86 (64-bit) virtual machine), the installation package chosen was Anaconda3-2019.07-Linux-x86_64.sh (note that is the Anaconda 3 version). To download the package, the wget command will be used. On any of the repositories previously indicated, right-click and copy the link of the desired package.
Ideally, install Anaconda in your home directory. Run:
$ cd ~
$ wget https://repo.anaconda.com/archive/Anaconda3-2019.07-Linux-x86_64.sh
This will download the package to the current directory. Note that the .sh extension indicates that this is a shell-type file. To install the package, enter and run:
$ bash Anaconda3-2019.07-Linux-x86_64.sh
This will start the installation process. Follow the screen instructions until the following appears on screen:
installation finished.
Do you wish the installer to initialize Anaconda3
in your /home/ec2-user/.bashrc ? [yes|no]
[no] >>> yes
It is very important to enter yes here. This will allow Anaconda to prepare its initialization file and integrate it to .bashrc, such that it will correctly initialize and run every time you launch the instance. Finally, reboot the machine once more.
To update all the packages of this distribution, run:
$ conda update --all
Finally, to clean up old packages and tarballs:
$ conda clean --all
8.2 Deep Learning (Ubuntu) AMI #
By default, conda and several packages come pre-installed in the Deep Learning AMIs. You can get the list of available (default) conda environments from the welcome screen, or by running:
$conda env list
For instance, to activate the TensorFlow(+Keras2) with Python3 (CUDA 10.0 and Intel MKL-DNN) environment, run:
source activate tensorflow_py36
After doing this, the prompt in the terminal will change and will indicate the active environment.
8.3 Verifying the installated software #
To check the correct installation of conda and python in either AMI, use the which command to locate them in your system:
$ which conda
$ which jupyter
$ which python
Also, you can check the specific version of Python with:
$ python --version
You can find any specific package with:
$ conda list <package_name>
Finally, if there is a package that you want that was not installed with the default distribution, install it using:
$ conda install <package_name>
Important note: The current Python version of the Anaconda distribution downloaded to the Amazon Linux 2 AMI is 3.7.X. However, the default Python version of the Conda distribution of the Deep Learning AMI is 3.6.X (when this document was written). This Python version works correctly with the rest of the packages preinstalled in the DLAMI. If you upgrade its version, you might affect the rest of them. I would personally recommend not to update the packages in the DLAMI unless you are sure that the upgrade will not affect critical packages used to take advantage of the full power of the instance, e.g. CUDA, Python, etc.
9. Launching a Jupyter Notebook Server in a Virtual Machine #
Launching a Jupyter Notebook Server in a remote virtual machine is a simple process, which basically consists on two steps:
- Launching a Jupyter Notebook in the remote machine — the instance (presented in this section);
- Tunneling the Jupyter Notebook from the instance (server) to your local computer, using a second
SSHconnection (presented in the next section).
These steps will be the same for either the Amazon Linux 2 AMI of the Deep Learning (Ubuntu) AMI.
Nonetheless, in this tutorial, two use-case scenarios will be presented: a simple/practical one, and an interruption-resilient one; I explain what I mean for the latter one in the following lines. One problem I faced when I started working with Jupyter Notebooks in AWS instances was that, every time the connection was interrupted — e.g. lost wifi, computer went to sleep, etc. —, and if I was running a lengthy process in the instance — e.g. training a ML model —, this would result in losing the connection to the instance — i.e. SSH processes would get terminated (which is obvious, since my machine would have disconnected) —, but also in the Jupyter Notebook losing the connection with its kernel, thus losing whatever progress that process had done.
In this sense, this section and the following one will have two subsections each, explaning the procedure for the simple case and for the interruption-resilient case, the latter being based on De Azambuja’s post, which explains very well this procedure. In this tutorial, some additional details regarding this procedure will be explained.
9.1 Simple case #
In the current opened SSH connection to the instance, start a Jupyter Notebook:
$ jupyter notebook --no-browser --port=8899
The --no-browser flag will allow to start a Jupyter Notebook in the instance without forwarding it to a local web browser (which does not even exist in the Virtual Machine; no web browser has been installed). The --port=8899 argument will send the Jupyter Notebook to the port specified in the argument, 8899. Generally, the port should be any number between 8000 and 9000.
After launching the Jupyter Notebook, the shell window in which you launched it will be now dedicated to running that process, and it will show the following message at the end:
    To access the notebook, open this file in a browser:
        file:///home/ec2-user/.local/share/jupyter/runtime/nbserver-5468-open.html
    Or copy and paste one of these URLs:
        http://localhost:8899/?token=9b0f0a59c52809144ba16b2314e4871194f4aad95a9b942c
     or http://127.0.0.1:8899/?token=9b0f0a59c52809144ba16b2314e4871194f4aad95a9b942c
This information will be useful to access the Jupyter Notebook Server later on. Also, note that the localhost IP address, in this case, is 127.0.0.1, and the port in which the Jupyter Notebook can be located is, as specified at launch, 8899.
9.2 Interruption-resilient case #
Interruption can be understood by anything that sends a HANGUP signal to the server. While this will not be explained in detail, a few examples are breaking the internet connection or closing the shell where Jupyter Notebook (and its kernel) are running through SSH.
To avoid sending a HANGUP signal, the nohup command will be used. nohup allows processes (e.g. Jupyter Notebook) launched on a shell window, a terminal, to keep running detached from that terminal, thus being immune to HANGUP signals that might interrupt ongoing processes. If you are familiar to how & works, note that there are some differences between nohup and &. This is clearly summarized
here. For our case, we will use both (which is the normal way to use nohup). When a process is run with nohup, its stdout and stderr are appended to a file, by default called nohup.out, which will be located in the directory where you launched nohup from.
For the interruption-resilient case, run:
$ nohup jupyter notebook --no-browser --port=8899 &
[1] 1093
nohup: ignoring input and appending output to ‘nohup.out’
The first output line above shows the process ID, PID, that corresponds to the Jupyter Notebook, 1093. The next line states where the output of the process is being appended to and stored. To get the prompt back, press Enter.
10. Tunneling to the Jupyter Notebook Server #
As stated in the previous section, the second step is to create a SSH tunnel from the local computer to the Jupyter Notebook being hosted in the instance (server). To achieve this, it is necessary to establish a SSH connection to the server and forward a localport to the hostport listening to Jupyter Notebook in the EC2 instance.
Note: SSH has several functionalities; one of them is called port forwarding. It consists on forwarding something going on on a local port in your computer, the localport, to a port in the host computer (or server), located at host:hostport. Connection between ports allows the transmission of data, which in our case will allow us to control a Jupyter Notebook hosted in an EC2 instance, from our computer. Also, note that the term
localhost, as you will see below, is just a default hostname used to describe the local sever IP address, of this computer — where this is whichever computer you are at. While some explanation about SSH is given here, note that this is not part of the scope of this document. A useful resource to understand local and remote port forwarding can be found
here.
10.1 Simple case #
In a new shell window, a SSH command to connect to the instance and forward your local port will be run. The general form of this command is as follows:
$ ssh -i private_key -NL localport:host:hostport user@server
The -N flag is for not executing remote commands (useful for when forwarding ports), and -L is for local port forwarding.
The second part of the command goes as follows: localport is the port in your computer that you want to forward — that you want to send to the host. This port is where you will, locally, connect to using a web browser and use to control the Jupyter Notebook that is running in the host computer — the instance. host is the localhost of the instance. In general, most computers’ localhost resides at 127.0.0.1. However, note that it refers to the localhost of the remote computer, not yours. Finally, hostport is the port listening to the software you want to connect to, in this case Jupyter Notebook — this is the port where we purposefully send Jupyter Notebook to, 8899.
Following the example we have been working on:
$ ssh -i my-key-pair.pem -NL 8010:localhost:8899 ec2-user@35.183.87.51
In this case, we will be able to access the remote Jupyter Notebook locally on port 8010. This will be explained further in the next section.
10.2 Interruption-resilient case #
The interruption-resilient case only demands a small variation from the previous command, with additional arguments. The general form of this command will be:
$ ssh -i private_key -nNTL localport:host:hostport user@server
Or,
$ ssh -i private_key -fNTL localport:host:hostport user@server
The -T flag is used to disable pseudo-TTY allocation, and -n to prevent from reading from stdin. -f does what -n does, but also sends the process to the background automatically and detachs it from the terminal — somewhat similar to what nohup does. Note that, if you use the -f flag, you might have to find the SSH process PID used for the tunnel manually to terminate it when you are done.
Finally, using the example in this tutorial:
$ ssh -i my-key-pair.pem -nNTL 8010:localhost:8899 user@server
Note: In practice, you can use the same port for both sides. I used 8010 for the localport and 8899 for the hostport just to be clear about the differences between them. The following section will finish rounding up the explanation about when to use each.
11. Opening Jupyter in the Local Computer #
Once you have launched a Jupyter Notebook Server in the EC2 instance, and used a SSH tunnel to forward a local port on your computer to the port where Jupyter Notebook is being listened on in the instance, you can connect to it.
The localport you used when creating the SSH tunnel is where you will be able to find the Jupyter Notebook Server in the local computer, although in this case, you will access that port through your localhost — the local host of your own computer. In a web browser, the port can be found using the address of the general form:
http://localhost:localport
In our example, this is equivalent to:
http://localhost:8010
A Jupyter Notebook should open and ask you for a password or token. Since a password has not been set (unless you did), the token provided when Jupyter Notebook was launching has to be used. It can be retrieved from the shell window where Jupyter was launched from:
    ...
    Or copy and paste one of these URLs:
        http://localhost:8899/?token=e91abca23dbe81363f5532148ae8060ce601d2283933c7aa
Note that, while the message says localhost:8899, this is only valid for the localhost of the server. In your computer, you have to use the localport you passed into the SSH command for port forwarding.
In this case, the token is e91abca23dbe81363f5532148ae8060ce601d2283933c7aa.
If you used the interruption-resilient case — if you launched Jupyter using nohup —, you can retrieve this message by running $ jupyter notebook list or from the nohup.out file, by running $ less nohup.out.
Note: If you prefer to use a password to access the Jupyter Notebook Server, you have to set it up on the server side. You can find how to do it here.
12. Disconnection, Reconnection and Termination #
This section will cover three processes part of every workflow. Disconnection consists on closing all SSH connections to the instance, reconnection on reestablishing all necessary connections to the instance, and termination on adequately closing processes in the remote and local machines, such that you can later stop and/or terminate the instance.
If you used the simple case, the workflow process will be like this:
- Finishing your work and saving everything;
- Terminating the processes in the remote machine; and,
- Disconnecting from the instance.
On the other hand, if you used the interruption-resilient case, your process can be like this:
- Leave some lengthy process running on the server;
- Disconnect from the instance;
- Reconnect to the instance;
- Finish your work and save everything;
- Terminate the processes in the remote machine; and,
- Disconnect from the instance.
Steps 1–3 can be repeated as many times as you need for the latter case.
12.1 Disconnection #
Disconnection can basically happen in two ways: purposefully — by closing the SSH connections to the instance —, or by chance — the SSH connections break due to an exterior factor (e.g. losing wifi). If you used the interruption-resilient case and disconnection occurs, however it happens, will most likely not have any effects on running processes in the Jupyter Notebooks, nor on the notebooks themselves. Furthermore, even if you suffer from a sudden disconnection, Jupyter Notebooks are set by default to autosave your work. If you used the simple case, non of the previous applies.
As stated at the beginning of this section, disconnection is only used in the simple case after termination (see subsection 12.3). The steps to safely disconnect from the instance are the following:
- Close the port forwarding tunnel between the local computer and the server by pressing
Ctrl+Con the shell window where this tunnel is being executed from; and, - After terminating Jupyter Notebook (as shown in subsection 12.3), and when the prompt appears back again, close the
SSHconnection to the instance by running:
$ exit
For the interruption-resilient case, if you want to purposefully disconnect from the instance and leave Jupyter Notebook running, you can safely disconnect from the instance by doing the following:
- Save all running notebooks;
- Close the port forwarding tunnel between the local computer and the server by pressing
Ctrl+Con the shell window where this tunnel is being executed from; and, - Close the
SSHconnection to the instance from the shell window where Jupyter Notebook was launched from. To do this, run:
$ exit
Important note: For the interruption-resilient case, after steps 1–3 are completed, the local computer can be let to sleep and/or can be disconnected from the internet. However, if you left running process on the server (e.g. you are training an ML model), you cannot close the browser tabs where Jupyter notebooks are running. More broadly, you cannot turn off the local computer. The reason for this is that the content you see, frontend, will detach from the backend, and you will not be able to visualize any outputs that happen between the disconnection–reconnection. This is due to the websocket architecture inherent to Jupyter Notebook. In fact, this is still an open issue. When you reconnect, you will see the notebook still running in the tree, and if you open it again it will show you whatever was there the last time it was saved. If you didn’t close the tabs, you can recover that lost content. This will be explained in the next subsection.
12.2 Reconnection #
Reconnection consists on reopening the SSH connection to the instance, reopening the SSH tunnel for port forwarding, and reconnecting each Jupyter notebook to its kernel. Again, it can only be performed repeatedly if the interruption-resilient case was used. Once you are ready to reconnect, do the following:
- Reconnect to the instance using
SSH; - Reestablish the tunnel for port forwarding using
SSH; - Go back to each Jupyter notebook that was left running and click on
OKin the message regarding the lost connection/trying to reconnect; and, - Finally, there will be two error/warning buttons on the top of the notebook. First, click on the Error button, and then, click on the Not Connected or Reconnecting button.
If you left processes running that have expected outputs, very few of them can be lost in this process (e.g. if you have something printing to the console every second). Note that this only refers to outputs you see on the screen. However, assigned variables will not be lost and all ongoing processes should continue running seamlessly.
If the screen does not update automatically after completing steps 1–4, go to the Kernel tab on the top, and click on Reconnect. However, note that this procedure can interrupt any running processes in the current notebook, and if so, they will need to be re-run (and in some rare and weird cases, the kernel will restart from scratch).
12.3 Termination #
Termination is needed for both cases when you are done working with the instance and you want a safe way to terminate Jupyter Notebook.
If you used the simple case to launch Jupyter Notebook:
- Save, halt and close all running notebooks;
- Go to the shell window that is dedicated to running Jupyter Notebook and press
Ctrl+C. This will make the prompt appear again; and, - Disconnect from the instance following the steps stated in subsection 12.1.
If you used the interruption-resilient case to launch Jupyter Notebook:
- Save, halt and close all running notebooks;
- Close Jupyter by either clicking on Quit, by running
jupyter notebook stop, or by locating its PID (either by looking to what was returned when you launchednohup, something like[1] 3679, or by finding the PID using$ ps -eF|grep jupyter-notebook|grep -v grep) and running$ kill PID. You can make sure that there are no Jupyter Notebook processes left running by running$ jupyter notebook list; and, - Disconnect from the instance following the steps stated in subsection 12.1.
After terminating and disconnecting, proceed to Stop or Terminate the instance from the AWS EC2 Console, by selecting the instance, and clicking on Actions/Instance State/Stop or Actions/Instance State/Terminate. Stopping the instance is equivalent to turning off a computer. By doing so, AWS will stop charging you for the use of the instance but will keep charging you for any EBS volumes that are above the free tier limit. Terminating an instance will eliminate it from your console and will delete any EBS volumes that are marked for deletion upon termination of the instance.
13. Conclusion #
This tutorial was meant to be a walkthrough of the necessary steps to:
- Create an AWS EC2 instance;
- Connecting to that instance using a
SSHtunnel; - Getting the instance ready to work by updating its libraries;
- Installing and setting up Anaconda and Jupyter;
- Launching a Jupyter Notebook server on the instance;
- Creating a
SSHtunnel to connect to the instance’s Jupyter Notebook server; - Making sure that that tunnel is resilient to connection interruptions;
- Adequately terminating Jupyter, closing the tunnels and disconnecting from the instance.
I hope this post has been helpful! Please let me know your feedback in the comments.
14. Acknowledgements #
- Amazon Elastic Compute Cloud Documentation
- The Jupyter Notebook — Documentation
- OpenBSD manual page server for SSH(1)
If there is any link, source or citation inadequately described or omitted, please let me know and I will fix it as soon as possible.
comments powered by Disqus